Showing posts with label recipe. Show all posts

Sunday, February 21, 2016

Individual Potato Gratins with Parm and Goat Cheese

One of my favorite guilty pleasure meals is most certainly a good old fashioned steak dinna (as I like to call it!). And, let's be real - what's a steak without potatoes? I concoted an incredibly delicious spin on potatoes au gratin that is just a touch lighter and cooks much faster than the classic. My version features garlic, rosemary, parmesan and herbed goat cheese but you can certainly swap those flavors out for something you prefer more (could be bacon and cheddar!). If you've got a mandolin slicer, this recipe with be even easier, otherwise, sharpen your knives! 


Ingredients:


4-6 new red potatoes
2 tablespoons butter
1 cup milk (any variety - I used 2%)
2 tablespoons flour
2 large cloves garlic
1 teaspoon minced fresh rosemary
1/3 cup shredded parmasean
1/3 log of goat cheese
Salt/Pepper to Taste
Cooking Spray 
Saucepan
Muffin Tin 


Directions:

 1.) Preheat the oven to 400 degrees. Wash potatoes well under cold water. Mince garlic, mince rosemary. With a mandolin slicer (or knife), thinly slice potatoes 1/16'' thick. Set aside. Thoroughly spray a 6 cup muffin tin with non-stick cooking spray. Stack potatoes in each greased well of the pan, distributing evenly. 
2.) In a saucepan over medium heat, melt 2 tablespoons butter with minced garlic and rosemary until fragrant (about 2 mins). 
3.) Whisk in 2 tablespoons flour slowly, ensuring all lumps are worked out. 
4.) Once flour and butter are incorporated, slowly whisk in 3/4 cup of the milk. Reserve 1/4 cup for the next step. Bring the sauce to a slight bubble over medium and cut back to low. Add salt and pepper to taste. About 5 mins.
5.) Remove saucepan from heat and add in parmasean and goat cheese, stirring constantly with whisk. Add in reserved 1/4 cup of milk and return to heat. Bring back to a bubble until all cheese has melted and incorporated into the sauce.
6.) Pour the sauce over the stacked potatoes in the muffin tin. Don't worry about the sauce staying on top of the potatoes - it will melt through during cooking. Cover lightly with foil and place in over. Bake covered for 10 mins. Remove foil and bake additional 10-20 mins until potatoes are fork tender. Enjoy!


Theses gratins get a beautiful golden crust but remain perfectly gooey and smooth on the inside! 


Monday, July 6, 2015

Summer Cinnamon Zucchini Bread

The spontaneous summer torential downpours and steamy sun are finally starting to pay off here in Southern Maryland as gardens begin producing the fruits of all our spring labor. Well, really my Dad's spring labor considering he is the one who planted our garden. Even if it is at my house, it's definitely his baby - I'm just lucky enough to be the closest one to reap the benefits. Win, win if you ask me! 

The first things to produce in my backyard have been the cukes and zucchini. Oddly enough, both are my absolute favorite things we grow. I was over visiting my parents and noticed a large loaf of something wrapped in foil in the fridge; a spark of excitement hit as I prepared myself for a snack (because there is nothing like a snack from your Momma and Daddy's no matter how old you are!). Zucchini bread! Mom and I sat down and had two big hunks, slathered in butter for lunch and I knew I had to give my hand at recreating this tasty treat. 

If you haven't had zucchini bread, you may think it sounds gross. Vegetables in what is supposed to a be a delicate, sweet bread? What? Don't let that get in the way of trying this recipe out. The zucchini works to both retain the lush moisture of this loaf as well as keep in perfectly bound together. Not to mention, it adds a great deal of fiber and vitamins. The zucchini is grated in this recipe so there is no strange textures or chunks for all you picky eaters out there. In fact, you literally cannot taste the veggie at all. After talking with my Mom and reading a few recipes, I decided to make one up and give it a try. My secret ingredient here is a cup of applesauce to add even more fiber, natural sweetness and nutrients. It also works to keep the loaf perfectly moist! Most recipes call for enough ingredients to make two loaves but I prefer to make only one so that is what this recipe will yield!


If you caught my last post, you know I've got a lot of cooking on my summer agenda. I thought I would kick of my culinary adventure by hopping right into a brand new recipe which I've penned as the first in my personal handwritten collection! 

Ingredients: 

  • 2 Eggs
  • 1/2 Cup Wesson Blend Oil (Vegetable Oil - could also do coconut)
  • 1 Snack Size Cup Apple Sauce (about 1/2 cup)
  • 1-2 Cups grated Zucchini 
  • 1/2 Cup Light Brown Sugar
  • 1/2 Cup White Sugar 
  • 1 1/2 Cups Flour (could use whole wheat, white, etc)
  • 1 tsp Baking Powder
  • 1 tsp Baking Soda
  • 1 - 2 tsp Cinnamon
  • 1 tsp Ground Ginger

This is my first handwritten recipe for my collection! Yay! 

Directions:


  1. Preheat the oven to 325 degrees.
  2. Grate 1-2 medium zucchini. Keep in mind one medium size grates to about 1 cup. 
  3. Combine all wet ingredients in mixer. Eggs, oil, applesauce. 
  4. Cream in the sugar, baking soda, baking powder, spices. 
  5. Slowly add the flour in, about 1/2 cup at a time until batter forms.
  6. Add in grated zucchini, mix well. 
  7. Grease 1 loaf pan with Pam-like non-stick spray. 
  8. Pour in batter and bake at 325 for approximately 1 hour. 

This makes an amazing breakfast with a little butter and cinnamon sprinkled on top. It is a perfect pair to steaming cup of coffee or spiced chai. I like to heat a piece in the microwave for about 20 seconds to warm it but it is certainly fine cold, too! 

Enjoy!

Friday, December 13, 2013

Best Oyster Dishes in Leonardtown, Maryland!

I have started to write for the Leonardtown Life Magazine and thought I would share my work with those of who do not live in the area. Check out this piece about the best oyster dishes in my town! 

St. Mary's County's love affair with the oyster began when Captain John Smith declared the species "Chesapeake Gold" back in 1634. As a staple to not only our local economy, but more importantly, to our local diet, Leonardtown celebrates our favorite mollusk each year at the St. Mary's County Fairgrounds. The Oyster Festival is home to the National Oyster Shucking Contest and Cook-Off; held at the end of October, this weekend is always packed with unique eats, live music and bushels of family fun. Mark your calendars; next year's festival will be held October 18-19. For more information, visit www.usoysterfest.com

Dishing Up Leonardtown


                “He was a bold man who ate the first oyster.” –Jonathan Swift

The muddy mollusk may not be the most pleasing to our eye but where it lacks in appearance, the hankered oyster makes up in its uniquely earthy flavors. Since the docking of the Ark and Dove, this briny bi-valve has remained a staple in the diet of Southern Marylanders. The options seem endless in the preparation of the oyster: a splash of hot sauce, scalded to briny perfection, battered and deep fried, smoked, raw with just a drop of vinegar, baked, sprinkled with the bite of raw onion, floating in a creamy stew, or delicately served on the half shell garnished with bits of salty bacon. Thanks to our large community of hardworking watermen, often times we can consume oysters for dinner which have been caught and shucked in the early hours of that very same morning. Leonardtown restaurants feature this coveted mollusk year round; from sandwiches and stews to perfectly posed half shells and mountainous dinner platters, take a look at the variety that our town offers with this local staple.

Café des Artistes, in the heart of Leonardtown Square, offers its patrons an authentic French dining experience with a charming local flare. The Café provides the ideal atmosphere for sharing a glass of wine with a friend or enjoying a quiet family meal. The oyster makes an appearance as an appetizer on their menu in the Oysters Café or “Les Huitres Café des Artistes.” Served delicately on the half shell, this dish featured a plump oyster topped with fresh Maryland crab meat, sautéed spinach and shallots covered in provolone cheese. The delicate taste of the crab meat works as an excellent balance to the savory oyster; the spinach, shallot and bubbling, crispy provolone topping serve as a rich blanket to the fresh seafood. Café des Artistes gives this local favorite a look and taste of pure elegance.


Fitzies Marina Restaurant and Pub, nestled at the end of Joe Hazel Road, is one of Leonardtown’s many hidden treasures; with sweeping views of Breton Bay, this spot is a must for indulging in the coveted oyster. Fitizies seasonally features oysters three ways: on the half shell, Rockefeller style and of course, fried. The Rockefeller features oysters presented in the half shell, smothered in a creamy spinach and green onion topping complete with a healthy covering of cheddar jack cheese. The sweetness of the spinach mixture acts as a perfect complement to the briny oyster and salty cheddar jack. Their fried version of our local favorite certainly cannot be beat. I downed a half dozen in the blink of an eye; the fried oysters were generously coated in a mild breadcrumb mixture and fried to a crispy, golden brown. The freshness of Fitzies oyster dishes: insurmountable. For an oyster feast with a breathtaking view, Fitizies Marina Restaurant and Pub has you covered.


The Leonardtown Grille, just blocks from the Square, presents its patrons with an inviting family atmosphere. Their convenient location makes the Grille a great stop for a quick oyster satiation. The oyster finds its spotlight on the dinner platter menu; served alongside either a crab cake or small rack of ribs. I found the barbeque and oyster combination to be quite intriguing; I do love both of these foods, but together? The smoky barbeque paired with the crispy oyster turned out to be quite the palette pleaser. The ribs were tender, falling right off the bone, as I alternated bites between the oyster and the barbeque. The dinner is served with two sides; I went for the coleslaw and garden salad. The crisp cabbage and fresh salad served as a fantastic counterpart of the saucy ribs and fried oyster. The Leonardtown Grille provides its patrons with a plethora of options when designing their ultimate oyster dinners.

Reader Recipe:


This month’s recipe is an original from local artist, Carol Wathen. As a resident of Rosebank, a waterfront community in Leonardtown, Carol creatively named this original oyster dish in honor of her long time neighborhood.


Oysters a la Rosebank

Originator: Carol Wathen of Leonardtown

1 pint of oysters with its juice
1 tbsp all-purpose flour to thicken
1 tbsp of Worcestershire sauce
1 tbsp of soy sauce
1 tsbp of minced onion
4-5 shakes of hot sauce
2 tbsp of brown sugar
Touch of black pepper
Season salt to taste
Paprika for color

Directions:

In a skillet over medium heat, combine all wet ingredients, including the juice within the pint of oysters (add only half for a less briny sauce). Stir well and allow the sauce to begin to bubble; once bubbles begin to form, add in the brown sugar, flour and dry spices. Simmer for approximately 5-7 minutes. Add in oysters, wait for them to begin to curl up; once they begin to curl and reach appropriate doneness, transfer the saucy oyster mixture into a serving dish. This recipe can be served as a standalone appetizer or over rice for a more substantial meal.

Thursday, November 28, 2013

SoMD Stuffed Ham: The Play-By-Play

In our quest to stuff our first family ham, we turned to the recipe that was transcribed by my Mom from my great-grandmother (Nanny). Nanny's recipe is the traditional "North County" recipe. If you didn't catch my last post about the story of this coveted ham, check it out! It'll fill you on in the kale vs. cabbage debate. 
Here is the recipe we based our ham on: 

Ingredients:

10-12lbs ham that has been cured (aka corned ham)
3lbs kale (chopped fine)
2 heads of cabbage (chopped fine) 
10 onions (chopped)
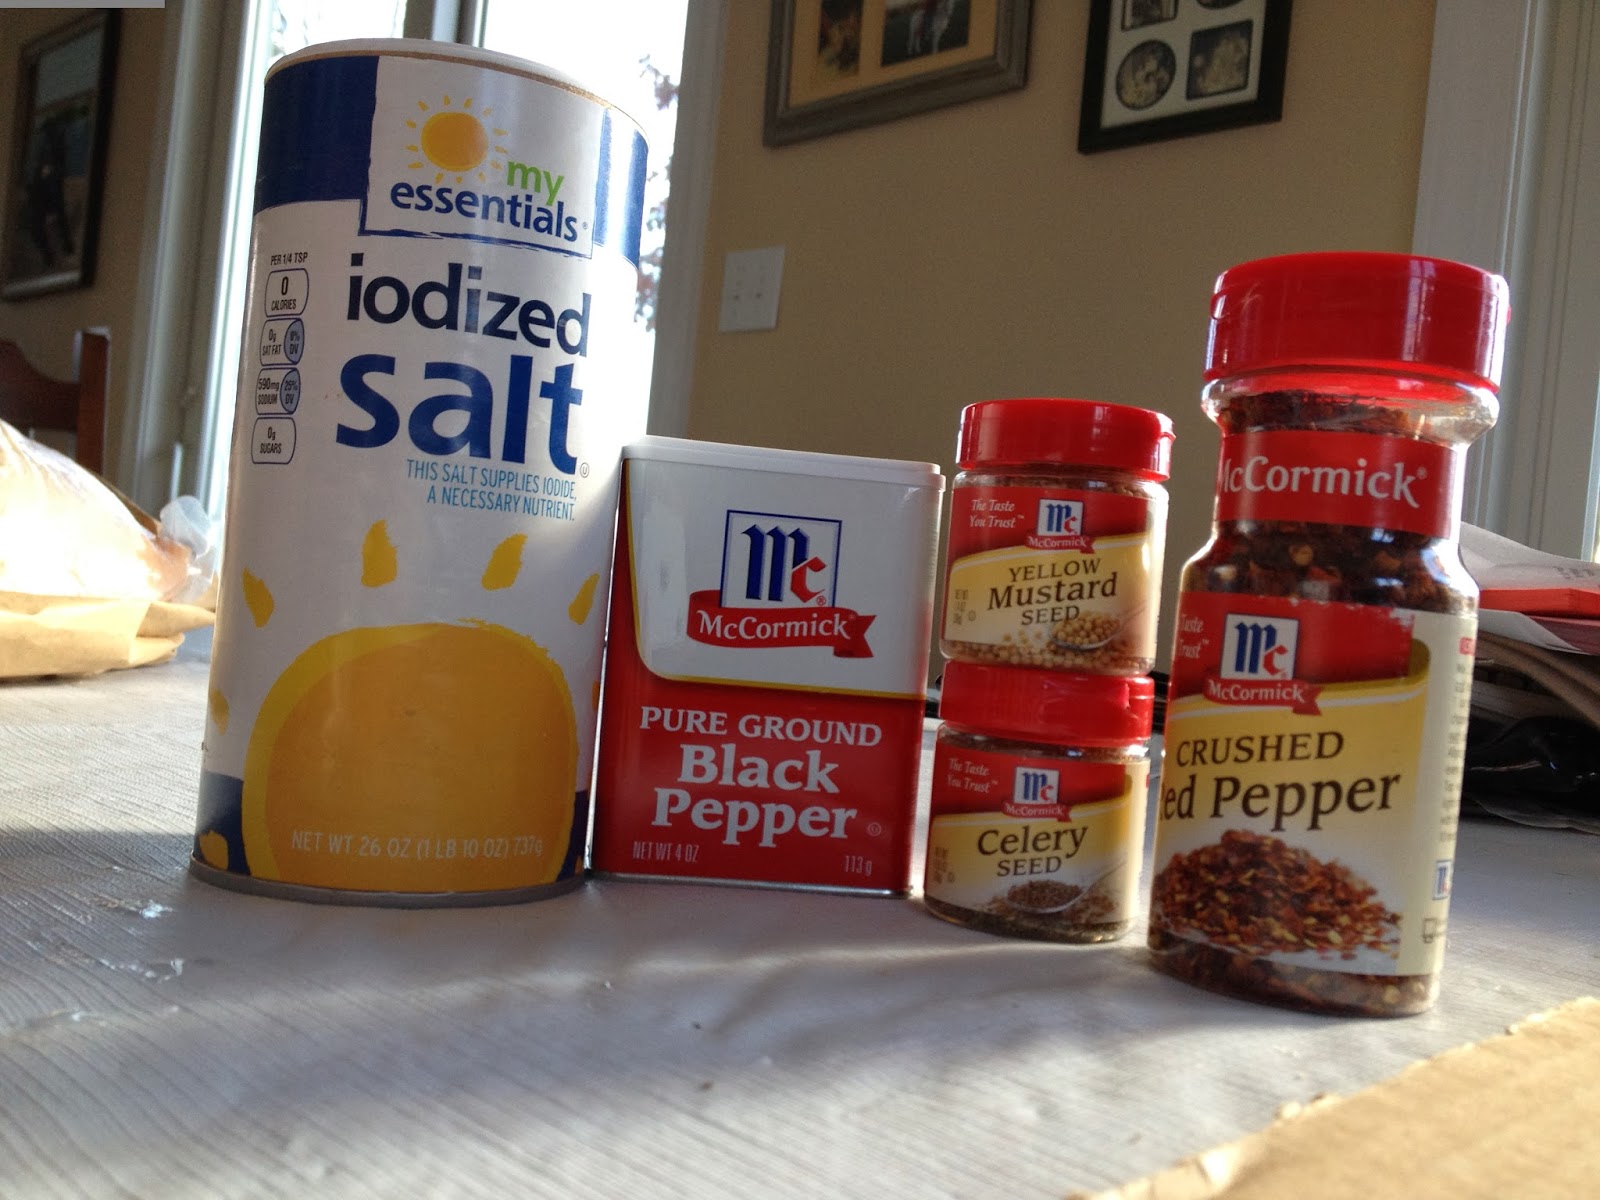
3 tbls salt
2 tbls red pepper
1 tbls black peppers
2 tbls celery seed
1 small jar of mustard seed

The REAL Recipe we ended up using:
23lb ham that has been cured (aka corned ham)
5lbs kale (chopped fine)
2 heads of cabbage (chopped fine) 
3lbs of yellow onions (chopped)
4 tbls salt
5 tbls red pepper
3 tbls black peppers
2 tbls celery seed
1 small jar of mustard seed


Now check out the play by play of our ham-stuffing adventure!


23 pounds of corned ham heaven!


Step One: The Debone
Using a sharp knife, we began to chisel away at the leg bone until it was completely removed.


This leaves the ham with a large cavity for the savory stuffing!


Step Two: Wash and Prep
We began by washing and de-stemming the kale and rinsing the cabbage. Then, we peeled the 3 pounds of onions and cried our eyes out. 


What a beaut!

Step Three: Choppin'
Next, we took small batches of the kale, cabbage and onion mixed and used the grater blade on our food processor to finely chop the mix. Shoutout to the fella that invented the food processor! I can't imagine how people chopped this many greens by hands. And the onions…Oh my!


Precise choppin'


The onion tears begin!


Supplies on deck. 
For the stuffing process, we used a vinyl tablecloth, kitchen twine, couple of knives, cheesecloth and an old pillow case. 


Begining the mixin'


Step Four: Spicin' 
We mixed all the spices together in a dry bowl; this makes it easier to evenly spice the stuffing.


Look at all that spicy goodness!


Step Five: Mixin' It Up
After throwin' together our spice, we decided the best way to get an even mix was to throw it all on the table and mix her real good. 


Pre-Spiced Stuffing


We sprinkled the spices and mixed it the good, old fashioned way…. with our hands!


Step Six: Stuffing the legbone cavity
We began by placing the ham on the table, legbone cavity side up and filled the cavity to the brim with our spiced mix. 


Action Shot!


Step Seven: Tie up time
After the legbone cavity was packed, we began tying the ham up to close the stuffed cavity.


We were on the struggle bus with the crappy kitchen twine we got from the grocery store. 


Step Eight: Flip Her Over
After the cavity got tied off, we flipped the ham over and cut 1" slits in meat to make pockets for the stuffing.


Butcherin'


Step Nine: Stuffin' Her Up
We took small pinches of the stuffing and began shoving it in the holes of the ham. This was innappropritately funny because the stuffing gets really juicy and tryin' to get it stick in the holes takes a  lot of intimate contact with the ham. 


Gettin' her nice and plump!


Step Ten: Sak it up!
Next, we wrapped the ham in cheesecloth and put it in an old pillowcase to prepare it for the boiling process. 


The final tie. 

We cooked the ham in a large stainless steel pot over a propane cooker. We normally use the cooker to steam hardcrabs in the summer but it worked perfect to slow boil the ham. After submerging the pillowcased ham in the pot, we cooked it for approximately 8 hours. It was great to have the option to cook ours outside because we didn't stink the house up! 

Check out our final product! 

Wednesday, July 3, 2013

Perfect Potluck Dishes


We recently had a potluck at work and I thought it would be the perfect opportunity to try out some new summertime appetizers. These recipes are all along the lines of "whatever I have in the fridge." These three dishes can be easily prepped the night before a party or potluck and they all withstand the brutal summer weather very well. They all three seemed to be crowd pleasers- especially the fruit brushetta! 

Spicy Tropical Brushetta

Ingredients:


1 pint of strawberries
1 peach
1 small mango
1/2 medium sweet onion
1-2 jalapeno peppers (optional)
3 tbsp fresh basil
3 tbsp balsamic vinegar
1 tsp fine sea salt
1 tsp pepper
1 tsp ground red pepper (optional)

Directions:

  1.     Rinse all fruits, basil and peppers.              

  2.     Finely chop strawberries, peach, mango and fresh basil. Place all contents in a medium-mixing bowl.
  3.     Add finely chopped jalapeno and onions
  4.     Add in balsamic vinegar, salt, pepper, and ground red pepper.
  5.     Serve cold with goat cheese and crackers or a french baguette.


Caprese Salad

Ingredients:

 3 vine ripe tomatoes
1 ball fresh mozzarella
1 bunch fresh basil
Salt and pepper to taste
Drizzle of balsamic vinegar/olive oil


Directions:

  1.         Rinse tomatoes and fresh basil under cold water.
  2.         Slice tomatoes and mozzarella approximately ¼ inch 
  3.         Pluck fresh basil leaves from stems. 
  4.         Layer tomato, basil, and mozzarella on a plate.
  5.         Drizzle with olive oil and or balsamic vinegar.


Pear and Gorgonzola Flatbread

Ingredients:


1 package of Garlic naan bread (2 pieces)
1 Bartlett pear
1/3 cup of Gorgonzola cheese crumbles
1 red onion
3 tbsp sugar
2 tbsp balsamic vinegar 
1/4 cup chopped pecans
1/4 cup chopped green onions
1 tbsp butter
Olive Oil

Directions:

  1.      Rinse pear and slice into 1/8 inch slices.
  2.      Peel and thinly slice the entire red onion.
  3.      Over medium heat, add the slice red onion. Cook on medium for approximately 5 minutes, once the onions begin to become translucent, add balsamic vinegar and sugar. Continue cooking for 10 minutes. Set aside when onions have caramelized.
  4.     Add sliced pears to the pan that the onions were cooked in. No need to clean in between; it will season the pears well. Cook on medium heat for approximately 5 minutes.
  5.     Rub naan bread with olive oil and sprinkle lightly with salt. 
  6.     Arrange cooled pears and onions evenly across the flatbread. Add chopped green onions, pecans and Gorgonzola crumbles.
  7.     Bake in 350 degree oven for 10-14 minutes or until the crust becomes brown and slightly crispy. Note- Gorgonzola cheese does not melt like traditional softer cheeses so do not wait for the cheese to melt!  


Thursday, June 13, 2013

Spaghetti Squash Stuffed Peppers


Two Ways

Spaghetti squash provides an excellent low carb alternative to pasta and rice. It is extremely simple to prepare and it's mild flavor gives it a tremendous amount of versatility. Normally, one would stuff green peppers with meat and/or rice but I decided to try a lighter version of this classic dish. Since I am currently only cooking for one (haha!), I decided to split this batch up and spice it two different ways (Indian and Italian) so that I wouldn't get tired of it. I used the same base filling for both and added slight variations on the veggies to enhance the spices used. For the Indian style peppers, I omitted the mushrooms because typically you don't find those in Indian cooking. If you haven't tried spaghetti squash yet, it is a must!


Ingredients:

Indian Style Peppers
1/2 cooked spaghetti squash (approx 2lbs raw)
1 cup of frozen cauliflower/broccoli/carrot mix
1 cup of frozen peas
1/8 cup chopped onion
1/4 cup chopped green pepper
1/2 can of Garbanzo beans (chickpeas)
2 large green peppers
1 packet of Tikka Masala simmer sauce
1 tbsp curry powder
1 tbsp turmeric
1 tbsp garam masala
1/2 tbsp of ground ginger powder
1 tsp garlic powder
1-2 tbsp of chilli flakes (depends on the spice level you prefer)
salt and pepper to taste

Italian Style Peppers
1/2 cooked spaghetti squash (approx 2lbs raw)
1 cup of frozen cauliflower/broccoli/carrot mix
1/2 cup of fresh chopped button mushrooms
1/8 cup chopped onion
1/4 cup chopped green pepper
2 large green bell peppers
1 1/2 cups of spaghetti sauce
1 tbsp italian seasoning
1 tbsp garlic powder
1 tsp garlic salt
1 tsp oregano (you can add more if you like but I am not a huge oregano fan)


Directions:


  1. Prepare the spaghetti squash by cutting it in half long ways. Use a metal spoon to scrape out the seeds and inside "guts." Sprinkle each half with seasoning of your choice. I usually use salt, pepper, chili flakes and garlic powder. Place each half, open side down, on a greased baking sheet. I always cover my sheet in foil to prevent a mess on my pans.


  2. Bake the spaghetti squash for approximately 40 minutes at 375 degrees. 
  3. Once the squash is cool enough to handle, use a fork to scrape the squash into a large mixing bowl.


4.Prepare the green peppers for stuffing by simply cutting off the tops and using a spoon to gently scrape the seeds and white flesh out of the pepper. Rinse all peppers thoroughly.

5. In a medium frying pan, pour 1 tbsp of olive oil into a pan over medium-high heat. Divide spaghetti squash in half. Add in ingredients listed for Indian style peppers. This will be onions, peas, squash, cauliflower mix and garbonzo beans. 
Indian Style Filling

         
Indian Spices

Italian Spices


6. Once the mix is heated through, spoon it into two of the large green peppers.  Repeat previous steps with vegetable mix for Italian style peppers if desired. 

7. Bake peppers at 350 degrees, covered with foil, for approximately 25-35 minutes until tender. 


Enjoy!